It is Sunday morning, and the house is quiet except for the low, steady hum of the refrigerator. You stand at the kitchen counter, flour dusting your forearms, holding a pastry blender that feels more like a medieval torture device than a functional cooking tool. You are trying to cut butter into flour. But the butter is softening rapidly, your kitchen is too warm, and instead of distinct little crumbles, you are left with a sticky, homogenous paste clinging to your fingers. When the oven timer finally rings, you pull out a tray of biscuits that look and taste like heavy, flat hockey pucks. The dream of a towering, golden, flaky morning biscuit feels miles away, lost in a mess of greasy flour and frustration.
The Architecture of Steam
The secret to a biscuit that splits open in perfect, buttery layers is not endless patience or an expensive culinary degree. It is simply understanding the physical architecture of steam. For decades, home cooks have been taught the painstaking ritual of cutting in the fat. The prevailing kitchen myth insists you must work the butter into the flour manually, carefully navigating the razor-thin line between perfectly blended and entirely melted. It is a stressful race against temperature. But what if you bypassed the blending entirely?
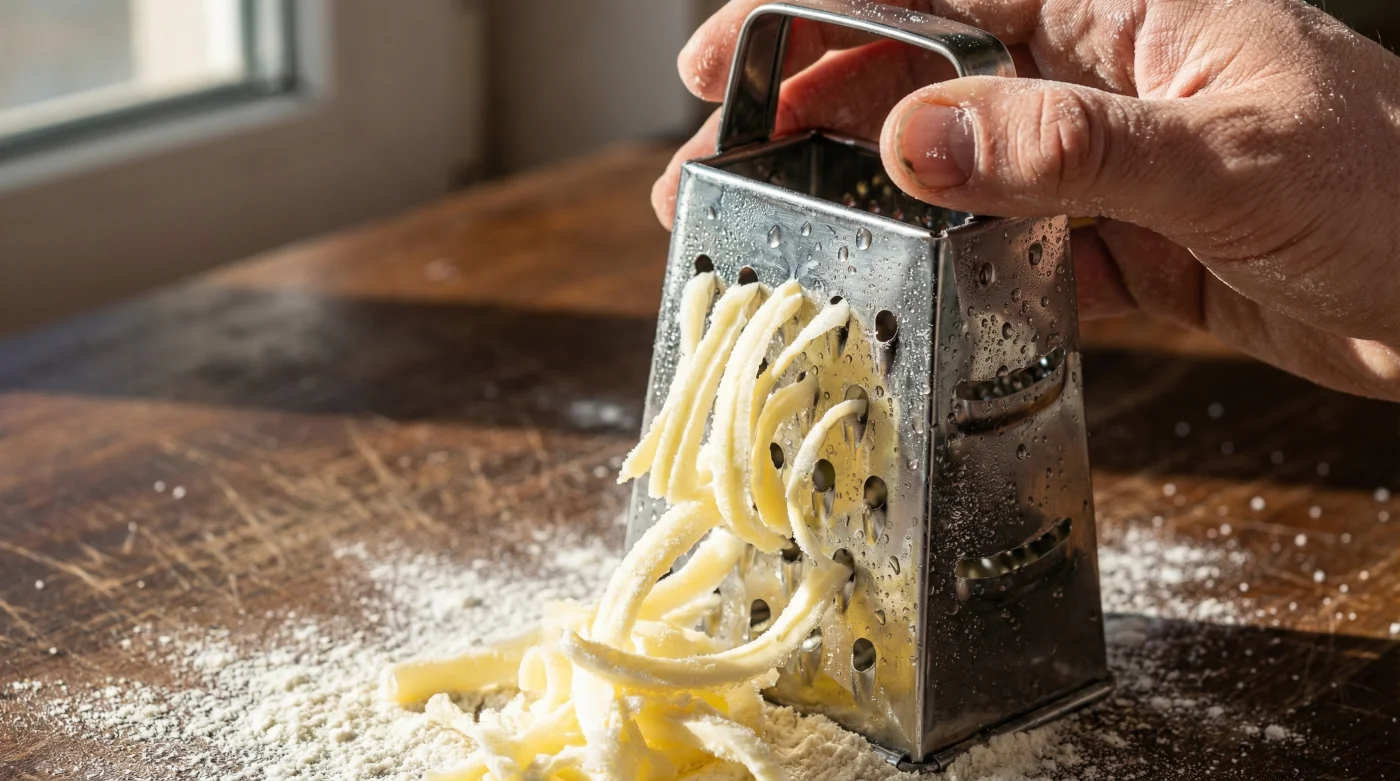
By taking a rock-solid stick of frozen butter and running it down the coarse side of a cheese grater, you instantly create perfectly uniform fat pockets. No blending required. The icy shreds toss effortlessly into the flour, remaining distinctly separated. When that cold fat hits a 425-degree oven, the moisture inside it vaporizes rapidly. The butter melts, leaving behind an empty space, while the expanding steam pushes the heavy dough upward. That is how a dense lump of flour becomes a light, towering masterpiece that shatters perfectly when you bite into it.
- Brown butter requires a scoop of milk powder for maximum toasted flavor.
- Cream cheese combined with condensed milk creates instant professional bakery frosting.
- Fresh jalapeño peppers face severe nationwide shortages following extreme Mexican droughts.
- Chocolate chip cookies develop professional bakery crinkles from aggressive pan dropping.
- Leftover bacon grease creates the ultimate savory stovetop movie theater popcorn.
| Home Cook Profile | The Grated Butter Benefit |
|---|---|
| The Rushed Parent | Reduces hands-on biscuit prep time from twenty frustrating minutes to a mere five minutes. |
| The Beginner Baker | Eliminates the stressful guesswork of knowing exactly when butter is perfectly cut in. |
| The Pastry Perfectionist | Ensures maximum vertical rise and distinctly separated flaky layers every single time. |
Building the Morning Snowfall
To master this technique in your own kitchen, you need to treat your butter like a block of sharp cheddar. Place a stick of your favorite full-fat butter in the freezer the night before you plan to bake. When you are ready to start, measure your dry ingredients into a large mixing bowl. Take the butter straight from the icebox and run it down the large holes of a standard box grater.
Hold the butter by the wrapper to keep the natural heat of your hand from melting the fat. As the butter shreds fall into the bowl, stop every few seconds to lightly toss them with the flour. This action coats each individual ribbon of fat in a dry layer, preventing them from clumping back together into a massive ball. You want the mixture to look like coarse, curly snow.
Once all the butter is grated and completely coated, pour in your ice-cold buttermilk. Do not overwork the bowl at this stage. Gently fold the liquid into the dry mixture until it just barely comes together into a shaggy, messy mass. Dump it onto your clean counter, pat it out flat, and fold it over on itself two or three times to manually build those tall layers. Finally, cut your biscuits with a sharp cutter, pressing straight down without twisting. The physical effort you exert is minimal, but the structural integrity you build is profound.
| Temperature State | Butter Behavior in Dough | Final Biscuit Texture |
|---|---|---|
| Room Temperature (68°F) | Absorbs completely into flour, drastically inhibiting any gluten formation. | Dense, cake-like, crumbly, and entirely flat. |
| Refrigerated (38°F) | Smears easily when handled with bare hands, requiring fast and precise blending. | Slightly flaky, but highly prone to heavy, dense patches. |
| Frozen (0°F) | Retains sharp, distinct shape when grated; creates pure, isolated steam pockets. | Maximum height, distinct pull-apart layers, ultra-light interior. |
Reclaiming Your Morning Rhythm
Baking should not feel like a frantic, messy race against melting fat. By changing one simple mechanical action, you remove the primary source of stress from the entire process. Grating frozen butter is more than just a clever kitchen hack; it is a practical way to reclaim your morning peace.
You no longer have to sacrifice the quality of your food for the sake of the clock. You can stand calmly at your kitchen counter, listen to the coffee brew, and effortlessly create a tray of magnificent, steaming biscuits. It is a quiet victory that transforms a chaotic morning routine into a reliable, comforting ritual. When you pull that pan from the oven and see those impossible, golden layers, you will wonder why you ever did it the hard way.
| Ingredient / Tool | What to Look For | What to Avoid |
|---|---|---|
| The Butter | High fat content (European style), unsalted, and frozen completely solid overnight. | Margarine, spreadable tubs, or standard room-temperature sticks. |
| The Grater | A sturdy stainless steel box grater with large, sharp shredding holes. | Microplanes, fine zesters, or flimsy plastic graters that bend under pressure. |
| The Flour | Soft winter wheat flour or a lower-protein all-purpose blend for maximum tenderness. | High-protein bread flour, which creates a tough, chewy, bread-like crumb. |
Baking is not about forcing ingredients to do what you want; it is about setting up the physical conditions for them to do what they naturally do best.
Frequently Asked Questions
Can I freeze the butter for just ten minutes before grating?
No, ten minutes will only chill the exterior. You need the butter frozen entirely solid, which usually takes at least two hours or ideally overnight in a standard freezer.
Do I need to clean the cheese grater immediately?
Yes, run the grater under screaming hot water the second you finish. If the butter dries and hardens into the metal crevices, it becomes incredibly frustrating to scrub out later.
Can I use a food processor with a grating attachment instead?
You certainly can, but the heat of the fast-moving motor and the extra dishes to wash often defeat the purpose of this incredibly fast, simple, five-minute morning method.
What if my hands get too cold holding the frozen butter?
Keep the bottom half of the butter stick wrapped securely in its paper foil. It acts as an excellent insulating barrier between your warm skin and the freezing fat.
Will this method work for pie crusts and scones as well?
Absolutely. Any pastry that relies on distinct, cold fat pockets for a flaky texture will benefit immensely from this frozen grating technique.