Friday night pizza at home is a beloved American tradition, but there is one frustrating reality that plagues even the most ambitious home chefs: the dreaded soggy center. You crank your oven to its maximum temperature, invest in expensive baking steels, and meticulously knead your dough, only to slice into a pie that flops lifelessly on the plate. Most people immediately blame their hydration ratio or their oven’s maximum heat capacity, but the real culprit is a fundamental misunderstanding of radiant heat transfer. You might assume your equipment simply lacks the power of a commercial brick oven, yet the missing link is actually a tiny adjustment to how your appliance processes the heat it already generates.
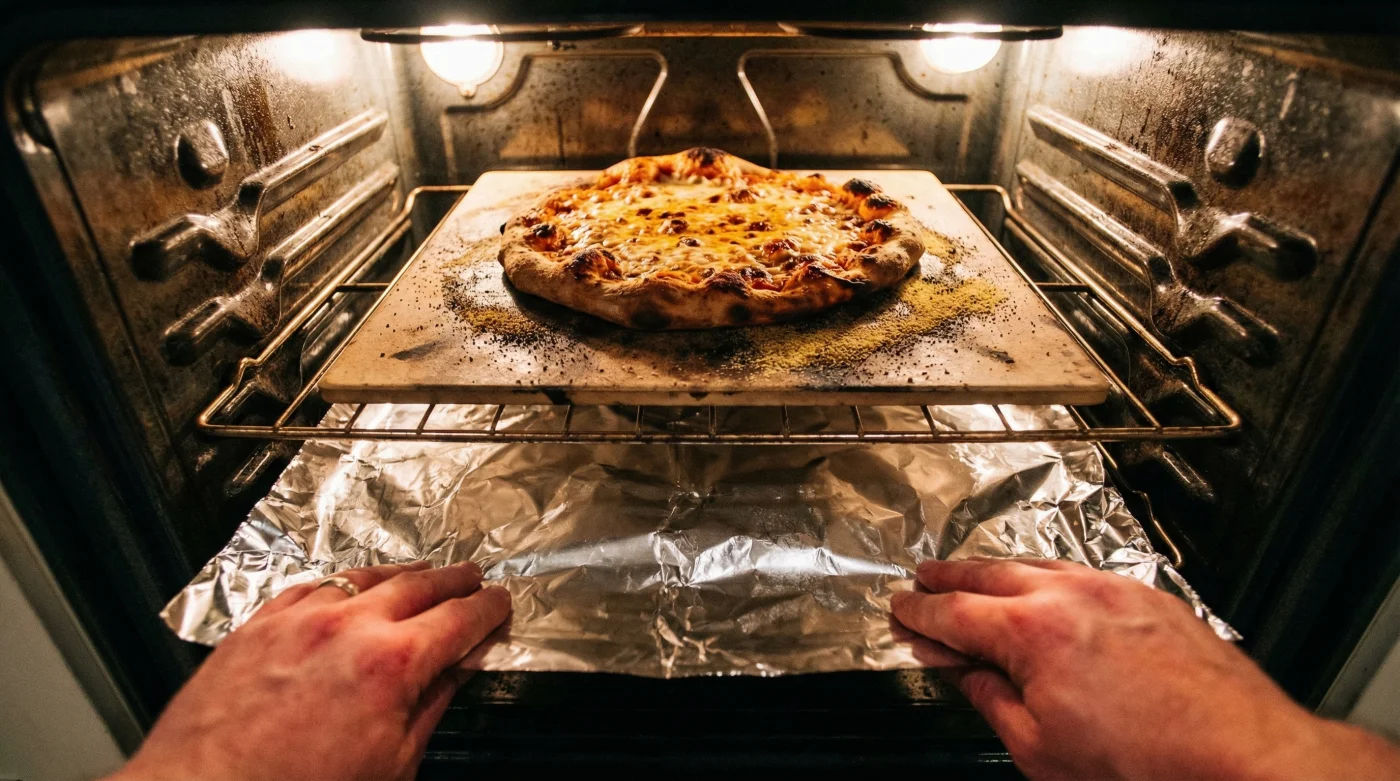
There is a hidden habit utilized by elite pizzaiolos that transforms a standard residential oven into a hyper-efficient thermal chamber, and it costs less than a dime. It completely defies the standard practice of wrapping crusts to prevent burning or sliding Aluminum Foil directly under the dough, which actually creates a disastrous, moisture-trapping barrier. Instead, this one strategic physical modification redirects ambient thermal energy with pinpoint accuracy, delivering that elusive, structural crunch to your crust without drying out your delicate toppings.
The Diagnostic Breakdown: Why Your Crust Fails
Before implementing our precision technique, we must analyze the structural failures of standard home pizza baking. When you place a pizza on a stone or steel, the heat is absorbed by the dough, dropping the temperature of the surface immediately. If the ambient heat in the oven cannot replenish the stone’s temperature fast enough, the dough steams rather than bakes. Experts advise that a proper crust requires immediate, aggressive heat to trigger the Maillard reaction and achieve a rapid oven spring.
Here is a diagnostic breakdown to help you identify what is currently going wrong in your kitchen:
- Symptom: Pale, doughy center. = Cause: Insufficient conductive heat transfer from the baking surface due to rapid thermal drain.
- Symptom: Overcooked cheese with an undercooked base. = Cause: Top-down radiant heat is overpowering the bottom-up conductive heat.
- Symptom: Crust is tough and chewy rather than light and crispy. = Cause: The baking time is too long due to low ambient heat reflection, causing the dough to dehydrate slowly.
Table 1: The Transformation Matrix
| Target Audience | Traditional Method Experience | The Reflective Foil Hack Benefits |
|---|---|---|
| The Casual Home Cook | Soggy crusts, uneven browning, frustration with standard pans. | Immediate structural integrity, no expensive gear required. |
| The Aspiring Pizzaiolo | Decent results but lacking the final 10% of commercial crunch. | Enhanced thermal conductivity without upgrading the oven. |
| The Professional Chef at Home | Struggling to replicate commercial oven dynamics. | Perfected top-to-bottom heat ratio using Aluminum Foil reflection. |
To truly conquer this culinary hurdle, we must first look at how heat behaves inside a standard residential cooking chamber.
The Science of Reflected Thermal Energy
Your oven generates heat from the bottom element, which rises and typically escapes or absorbs into the dark, matte walls of the appliance. By introducing a strategic layer of Aluminum Foil on the lower rack—not the absolute floor of the oven, which creates a fire hazard—you create a radiant mirror. This reflective shield bounces the escaping infrared radiation directly upward, bombarding the underside of your pizza stone or baking steel with concentrated thermal energy.
- Brown butter requires a scoop of milk powder for maximum toasted flavor.
- Cream cheese combined with condensed milk creates instant professional bakery frosting.
- Fresh jalapeño peppers face severe nationwide shortages following extreme Mexican droughts.
- Chocolate chip cookies develop professional bakery crinkles from aggressive pan dropping.
- Leftover bacon grease creates the ultimate savory stovetop movie theater popcorn.
Understanding this thermal reflection naturally leads us to the exact mathematical temperatures required for optimal baking.
Decoding the Thermodynamics and Precision Metrics
To execute this technique flawlessly, you must treat your oven like a laboratory. Precision is everything. The reflective properties of the foil rely heavily on proper preheating protocols and specific spatial measurements. You cannot simply toss the foil inside and expect a miracle; the thermodynamics require precise dosing of time, temperature, and distance.
Table 2: Precision Dosing and Thermodynamics
| Metric / Phase | Recommended Value | Scientific Mechanism |
|---|---|---|
| Preheat Temperature | 500°F to 550°F (Max Setting) | Maximizes radiant emissivity from the lower heating element. |
| Preheat Duration | 45 to 60 Minutes | Ensures the baking stone reaches maximum thermal saturation. |
| Spatial Distance | 4 to 6 Inches Below Stone | Creates the optimal focal length for bouncing infrared radiation. |
| Baking Time | 7 to 9 Minutes | Prevents moisture loss while ensuring maximum starch gelatinization. |
By strictly adhering to these metrics, you guarantee that the heat hitting the bottom of your pizza crust is exactly proportional to the ambient heat cooking your cheese and toppings.
With the mathematical foundation established, you must now master the exact physical sequence of setting up your oven.
The Implementation Protocol: Step-by-Step Execution
Now that the theory is clear, the physical modification must be executed with safety and precision in mind. Placing Aluminum Foil incorrectly can block essential airflow, warp your oven’s built-in drip trays, or even pose a risk of melting if it makes direct contact with an exposed heating element. Always ensure your oven is completely off and cool before making these structural adjustments.
The Top 3 Rules for Oven Modification
- Rule 1: Never place foil on the oven floor. Direct contact with the lowest surface can trap heat against the enamel, leading to permanent damage. Always use the lowest available wire rack.
- Rule 2: Stretch the foil taut. Wrinkles and crumples diffuse the heat unpredictably. You want a smooth, mirror-like surface to reflect the thermal waves uniformly upward.
- Rule 3: Size matters. Ensure the sheet of Aluminum Foil is slightly larger than the diameter of your pizza stone above it, creating a wide enough net to catch and reflect the ascending heat column.
Once your oven architecture is perfected, you can begin troubleshooting the specific materials you choose for this culinary hack.
Material Selection: The Quality Guide for Maximum Crispness
Not all foil is created equal when it comes to manipulating high-temperature environments. Thin, cheap wraps will flutter in the convection currents of your oven, potentially tearing or failing to reflect the energy efficiently. You must select the right gauge of material to ensure stable, continuous heat reflection throughout the entire baking process.
Table 3: The Quality Guide and Progression Plan
| Material / Action | What to Look For (The Ideal) | What to Avoid (The Danger) |
|---|---|---|
| Foil Thickness | Heavy-duty, commercial grade (1.5 mil+). | Standard or economy wraps that tear under high ambient heat. |
| Foil Finish | Shiny side facing exactly upward toward the stone. | Dull side up, which absorbs rather than efficiently reflects heat. |
| Baking Surface | Cordierite pizza stone or 1/4-inch baking steel. | Flimsy aluminum pans or baking sheets that warp. |
| Dough Preparation | Room temperature dough, resting for at least 2 hours. | Cold dough straight from the refrigerator, which shocks the stone. |
By mastering these subtle material choices, you will consistently engineer a restaurant-quality pie right in your own kitchen.